What’s a Spec(ification)?
October 30, 2018
As a label and packaging manufacturer, the term “spec” gets thrown around our facilities quite often in varying contexts. Before we dig into what a spec is at the world of Inland, let’s get to the basics — what does our good friend Merriam-Webster offer us:
specification
/ˌspesəfəˈkāSH(ə)n/Submit
Noun
- an act of describing or identifying something precisely or of stating a precise requirement.
- a detailed description of the design and materials used to make something.
- a standard of workmanship, materials, etc., required to be met in a piece of work.
The Webster definition is a good basis for how the term is used in the manufacturing of labels and packaging. However, there are many different types of specs: print specs, material specs, finishing specs, product specs…you get the point. The purpose of a specification is to define a set of requirements for a product, a process, or a service. Contents of a specification should include, but not be limited to, all inputs and characteristics that are expected to meet the next user’s and/or end user’s requirements.
For today’s discussion, we are going to talk about step one, a print specification. The basic need behind a print specification can be tracked back to consistency and repeatability. In order to promise consistency from proof to press, Inland completes a process referred to as fingerprinting. A press fingerprint documents how our presses print with variables such as inks, anilox rollers, etc. This process helps us optimize our press to a repeatable state by measuring density and dot gain. I know, I threw a lot of printing jargon at you, but the moral of the story is a wealth of testing and time goes into the fingerprinting process to create established print specifications. A print spec includes requirements needed in order to print a product successfully on press. Inland has prepress specs for each product segment and press that we will share upfront with new customers.
One of the first steps in a new project is setting up a dieline. A dieline (the shape of the label) is what we refer to as an Inland Master Mark. Once the dieline is created, we share it with our customers and their design agencies so all artwork can be placed and adjusted based on the specifications allowed for on our presses. If you can believe it, we have almost 6,000 different master marks in our database. Once we receive a new piece of artwork, our prepress team reviews and adjusts based on the print specifications that will ensure success and consistency while on press.
Here are a few of the high-level specs that we check and update on all artwork that passes through our prepress department.
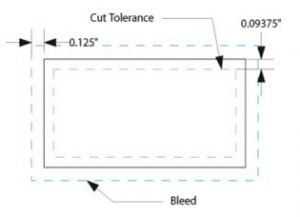
Bleed and Cut Tolerance (see visual below)
- On the Inland master mark template, we add the bleed line as well as a cut tolerance line. We take the desired size, adding a measurement to allow for bleed. Bleed is the area that extends beyond the trim edge to allow for any misalignment through the printing or cutting process. After a label is cut to size, the bleed ensures that there are no unprinted edges exposed on the final product.
- In addition to extending the dieline for bleed, we add a cut tolerance measurement on the inside of the trim line to ensure critical artwork, design elements, or copy are not being cut off during finishing.
Type/Type Size (see visual below)
- According to Google, there are over 300,000 fonts in the world. We provide a general guideline to the thickness required of a font (serif vs. sans serif) to ensure itis prevalent during the printing process. Each font may have varying thickness, but as a general rule of thumb, it will provide a guideline to ensure important copy is readable after printing. We also share recommendations of thickness and size based on positive (black) text and negative (white) text elements.

UPC Codes
- We create barcodes from numbers supplied in the artwork and then add tolerances that work on press. Inland is able to guarantee barcode scanability down to 80% size. It is critical that the barcode itself overprint in a single dark color.
Image Resolution
- Photoshop images, whether they are placed in an illustrator file or used independently for the entire label, must be a minimum of 300 ppi (pixels per inch) for an image used at 100% size. This is a spec that we wouldn’t want to cheat, as there is nothing less attractive than pixelated artwork!
All in all, specifications are a way to describe how the finished label or packaging should be built for optimal success, consistency, and predictability of how the end product will appear when it is delivered. Following Inland’s artwork guide will help you build your files appropriately for Inland’s printing process, in turn, ensuring an efficient workflow, timely delivery and minimal prep charges for your files. We’ve established guidelines specific to the various print processes as well as product segments that Inland offers guarantee designers are able to be flexible in the design of the label or packaging.